Table of Contents
GraphGen-based Convolutional Neural Network for the ZedBoard
This page hosts a Convolutional Neural Network demo for the ZedBoard built using the GraphGen compiler.
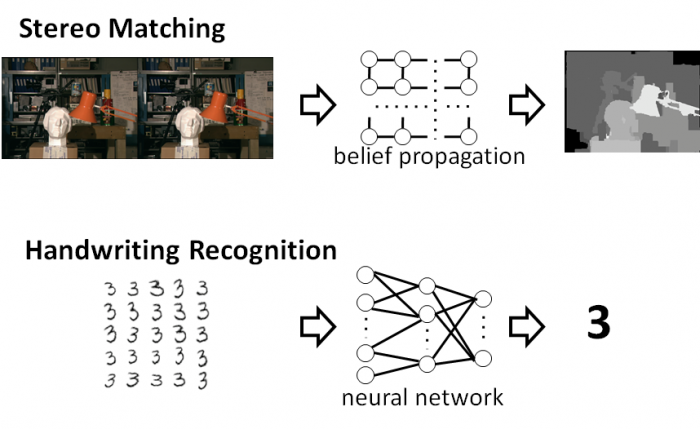
The GraphGen compiler generates complete, optimized FPGA implementations of graph computations from a high level specification. The paper (linked above) describes the operation of the GraphGen compiler in detail. Two examples of applications for the GraphGen compiler are depth reconstruction from stereo camera images through the Tree-ReWeighted message passing algorithm, and handwriting through a convolutional neural network.
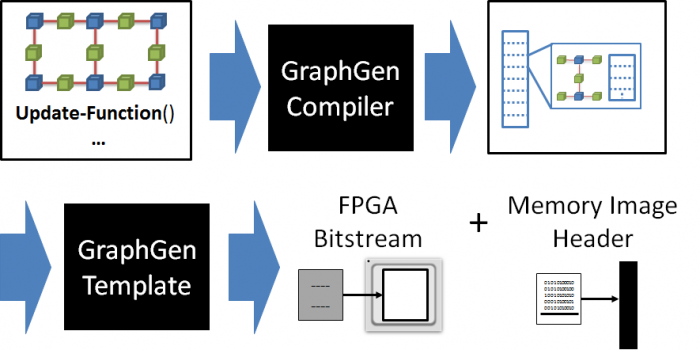
In order to use the GraphGen compiler, the application developer provides:
- A description of the structure of the graph, including the types of data stored at each vertex and edge;
- An update function to apply to vertices of the graph to perform the computation. This function consists of calls to accelerator functions that are applied to the vertex, it's neighbors, and the edges connecting it to its neighbors;
- An RTL implementation of the accelerator functions used by the update function. This implementation may be generated by a C-to-gates tool
 As illustrated in the image above, the GraphGen compiler partitions the graph into sub-graphs that will fit into the limited on-chip storage space of the FPGA, and generates an application that executes the graph application by fetching each sub-graph from DRAM and performing the update function on each of its vertices. The memory image header produced by the GraphGen compiler is combined with actual graph data for any instance of the computation, allowing the application to be used with any problem instance matching the graph description. Applications generated by the GraphGen compiler use the CoRAM FPGA memory abstraction to interact with DRAM and transfer data between the host computer and FPGA board.
The Demo
This neural network demo is a handwriting recognition application that uses a publicly available neural network that recognizes handwritten digits from the MNIST data set. In our 2014 FCCM paper, referenced above, we show results of accelerating this neural network on the Xilinx ML605 FPGA and Terasic DE4 FPGA using an Altera chip. This demo demonstrates the neural network on the ZedBoard, an inexpensive board that includes the Xilinx Zynq 7020 FPGA, a System-on-Chip that also includes two ARM cores. This is the same demo that we presented at Demo Night at FCCM 2014.
The demo uses software running on an ARM core to support host communications through the ZedBoard's ethernet interface, and communicate with the GraphGen-created processing system through an AXI slave interface. The processing system connects to the ZedBoard's DRAM through the Zynq chip's high performance AXI ports. This demo works on the original ZedBoard, and does not support the MicroZed, which uses a smaller FPGA. This demo runs through the 10,000 test images that come with the neural network on the CodeProject site. The demo runs through the test images, and allows the user to control the run time of the application by selecting a “small” subgraph size, where a single output neuron is calculated for each subgraph, or a “large” subgraph size, which uses the largest subgraphs that can fit on the ZedBoard. Larger subgraphs allow for more efficient computation because of data reuse among points in the subgraph.
Running the demo
All of the files needed to run the demo are located in zedboard_neural_network_demo.zip. This archive includes:
- GraphGenCNNManager.exe: A GUI program for managing the demo. This program runs on the host computer, and is written in Microsoft.net. It uses no special windows related features, and should run under Mono, although this has not been tested
- boot.bin: The system image for the ZedBoard. This file should be copied to an SD card which is then inserted into the ZedBoard's SD card reader.
- 4 data files, called dram-merge.bin, dram-merge-small.bin, t10k-images.idx3-ubyte, and t10k-labels.idx1-ubyte. These files must reside in the same directory as GraphGenCNNManager.exe.
Demo Instructions
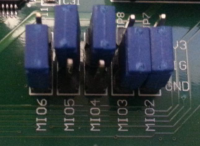
1. Configure the ZedBoard. Copy “boot.bin” from the archive onto an SD card, and put the card into the ZedBoard. Configure the ZedBoard to boot off of the SD card by setting jumpers M05 and M04 to 1, and M03 to 0, as shown in the picture below.
2. Turn on the ZedBoard, and connect it to the host computer through an Ethernet cable. The ZedBoard will be configured to IP 192.168.1.10, so the host computer must be configured to be able to communicate with this IP.
3. Wait for the ZedBoard to finish booting. The ZedBoard has booted when the blue “done” LED to the left of the OLED display (near the bottom corner) comes on.
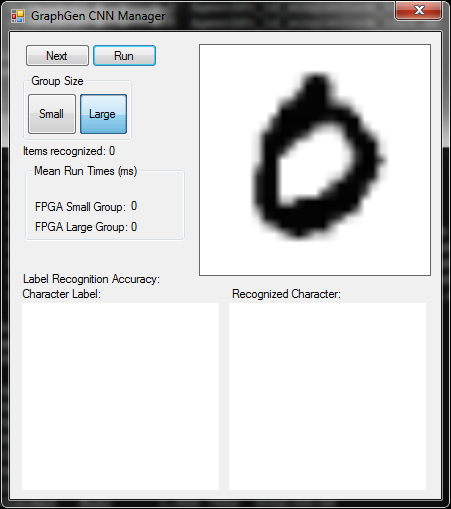
4. Start the host control program. The host program will show the following screen:

The UI for the host control program has four sections:
- The top left section has a control panel with several controls:
- A “Next” button allowing the user to advance to the next image in the data set
- A “Run” button that will cycle through all the images in the data set as quickly as possible
- “Small” and “Large” buttons, allowing the user to select “Small” or “Large” subgraph sizes for computation. The small subgraph size calculates a new value for a single neuron per subgraph, and the larger subgraphs calculate on the largest subgraphs that fit on the ZedBoard
- A “Mean run times” panel. showing the average run times for small and large subgraph sizes
- The top left image shows the current image to recognize.
- The bottom right image shows the recognition result for the current image, if available. It will be blank before the current image has been recognized
- The bottom left image shows the label for the current image. The first image that the application loads is not part of the labeled data set, so will not display a label.
5. Press the button labeled “Large.” This will cause the application to run, and show a recognition result in the bottom right pane. It will also show the run time of the application.
6. Press the button labeled “Small.” This will run the application with the small subgraph size, which takes significantly longer than the large subgraph size.
7. Press the button labeled “Large”, and press the “Run” button. The application will now cycle through the sample images. Note that as the application recognizes labeled images, the bottom right pane will show a correctly recognized result with a green background, and an incorrectly recognized result with a red background. Not also that the label for the current image is now shown on the bottom left pane, and the overall recognition accuracy rate for the neural network is updated in real time as the data is recognized. This neural network does get over 95% accuracy on the entire data set, but it is expected that there will be some errors.
Please contact Gabe Weisz with any questions.
Acknowledgements
Funding for this work has been provided, in part, by the National Science Foundation (CCF-1320725) and the Intel Science and Technology Center on Embedded Computing.


